

Secure Connections
Your Linux distribution should have OpenSSH prepackaged and, quite likely,
already installed. This should make ssh and scp availabe on the
command line. You may also want to check rsync, which is a command line utility
to copy or synchronize entire directory trees, while transferring only the difference in file contents.
Filezilla is a GUI program for both SSH File Transfer or SFTP.
Install using your distribution's software manager or download from filezilla-project.org.
Lauch the program, choose File > Site Manager > New Site. Configure SFTP connection to
gauss:
-
Protocol: SFTP - SSH File Transfer Protocol
Host: math.dartmouth.edu
Logon Type: Ask for password
User: your username on gauss
Click OK to save configuration or Connect to save and connect at once.
Some file managers in Linux — Dolphin, Konqueror, Nautilus … — can (persistently) mount remote directories using sshfs.
VPN
Dartmouth VPN
Dartmouth currently uses GlobalProtect VPN. See VPN in ITC knowledge base.
Math VPN
Math VPN uses OpenVPN technology. Search for and install OpenVPN client app for your device (available for Android, Chrome OS, iOS, Linux, macOS, Windows). Download MathVPN.ovpn configuration file. Use your OpenVPN app to add a new VPN configuration by importing the downloaded MathVPN.ovpn. There is no need to provide a certificate in VPN configuration.
When starting MathVPN connection use your “gauss” login credentials.
If the app doesn't offer a way to import configuration files, here are MathVPN parameters for manual configuration:
VPN type: OpenVPN
Gateway or portal: 129.170.28.58
Authentication: use your “gauss” username and password
Math Email (and the DND)
If you have Math Dept. user account (also known as “gauss” account), you also have a corresponding email account.
Your Math email arrives at (and can be sent from) math.dartmouth.edu server. It can be accessed
instantly and globally via Webmail — this does not require any configuration! As for email applications, all of them, including mobile,
can be configured to use your Math account using these generic settings:
Incoming server: math.dartmouth.edu, type: IMAP, port: 993
Connection type/encryption: TLS
Username: your Math username
Password: for the username above
Outgoing/SMTP server: math.dartmouth.edu, port: 465, protocol: TLS; authenticate with Math username and password.
Please use plain text to write email whenever possible (useplaintext.email), thank You!
Darmouth Name Directory lookups in Thunderbird
Edit → Preferences →
Composition →
Addressing
Click Edit Directories, Add:
General tab:Back in the Preferences window select “Dartmouth Directory” for Directory Server.
Name: Dartmouth Directory
Hostname: kiewit.dartmouth.edu
Base DN: dc=kiewit,dc=dartmouth,dc=edu
Port number: 636
Bind DN: your_netid@kiewit.dartmouth.edu
Use secure connection (SSL): yes
Vacation Autoreply
Autoreply message text for your Math mail is in .vacation.msg in your home directory
on gauss.
Autoreply is enabled by uncommenting the following two lines in .procmailrc:
#:0c
#|/usr/bin/vacation username
To stop autoreply, comment both lines out again, by inserting
# as the first character on each line.
.vacation.msg and .procmailrc can be edited with any text editor while on gauss
terminal or with a variety of GUI tools from Linux desktop,
for example, Filezilla, Nautilus, Dolphin etc.
Backups
Your workstation can be backed up to Math Dept. network storage. Contact help@math.dartmouth.edu for assistance.Connecting to eduroam Wireless Network
Use settings below with your username as NetID@dartmouth.edu and password:
- Security: WPA & WPA2 Enterprise
- Authentication: Protected EAP (PEAP)
- Inner auth. (EAP method): MSCHAPv2
- Username: d12345x@dartmouth.edu
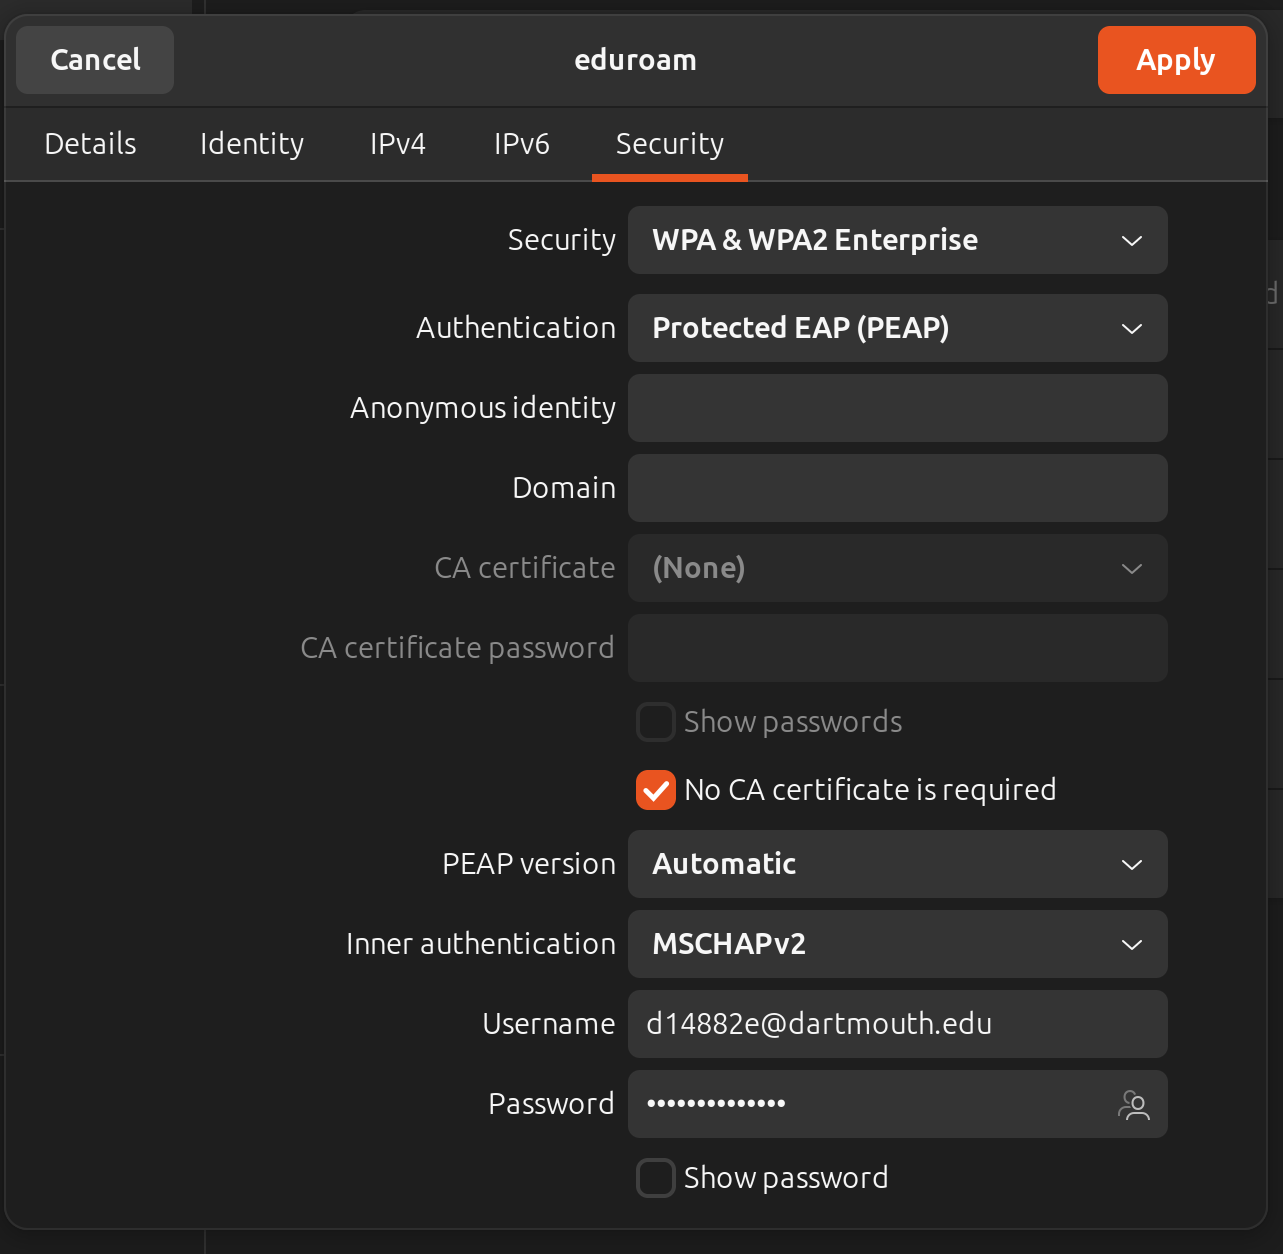
NB: Sometimes wireless connection can't be established without using a CA certificate.
In such case choose the DigiCert Root CA certificate from /etc/ssl/certs on your computer.
Mathematics at Dartmouth
27 N. Main Street | 6188 Kemeny Hall | Hanover NH 03755-3551 | 603.646.2415 | deptaa@math.dartmouth.edu